• March 29, 2023, 10 p.m.

    Introduction

    Misago uses hybrid approach to its templates. This means every page combines two types of templates to produce final result:

    Server-rendered templates: Those templates are .html files written in Django template language that are rendered on the server when user requests page for first time. They contain links, but there are no forms in them and all buttons they contain are disabled to prevent interaction.

    Client-rendered templates: Those templates are .js and .jsx files containing React.js components written in JavaScript. Those templates contain interactivity (buttons, forms, modals) and they use Misago's JSON API for reading and saving data to and from Misago.

    Types of templates used varies between pages and UI elements. For example, Misago's navbar is navbar.html server rendered template with empty <div id="user-menu-mount"></div> that UserMenu React.js component fills in when site is displayed by user's browser. Likewise user options section is almost completely done in React.js, with little HTML template telling user to enable JavaScript to change their options. On extreme end there are threads and user profile templates, where nearly whole temple exists in both HTML and JavaScript version.

    Note: This approach was great for speed back when it was originally implemented years ago, but its tiresome to work with by modern standard. Today React.js framework make it very easy to implement both client and server HTML using React.js components, and my plan is to eventually convert Misago to this model. However this conversion will require what currently appears to be years of work to happen.
  • March 29, 2023, 10:08 p.m.

    Development instance setup

    In order to customize Misago's templates, you will have to setup local Misago instance for development. Simplest way to do this is with Docker dev setup provided by Misago.

    First, git clone Misago code for version you are using on your site or, if you don't working against constantly changing and potentially unstable codebase, latest development code.

    Misago's readme file has installation guide for developers. You will have to follow it to setup your local development instance of Misago.

    Next parts of this guide assume that you already have Misago installed and running locally.

  • March 29, 2023, 10:15 p.m.

    Populating development instance with test data

    Your development instance will be quite empty at start. You can populate it with custom test data, or you can have Misago generate this data for you.

    if you don't have any idea for categories, you can have Misago generate some for you:

    $ ./dev manage.py createfakecategories 48
    

    To populate your dev forum with fake history of 300 days and 100 user actions per day, you can use fakehistory command:

    $ ./dev manage.py createfakehistory 300 100
    

    This will create quite a few test users, threads and posts. In case you want to login to one of generated users, the password is password.

    If you'll ever need to reset your dev instance, you can do this by running ./dev reset and confirming the command with y and enter. This will delete all existing data and uploaded files, and will bring your instance back to the state freshly after installation.

  • March 29, 2023, 10:44 p.m.

    Customizing HTML templates

    You can find Misago's templates in misago/templates/misago directory. There's base.html template that has base HTML used by pages, layout part templates like navbar.html and footer.html. And then there are other templates like threadslist directory with templates used for rendering threads lists pages by the server or emails templates with e-mail contents.

    If you open navbar.html template in your code editor, change it and save it, then refresh the Misago instance in your browser, you will see that it has changed.

    However this approach is has some drawbacks. When you run git pull to update your development instance with latest changes from GitHub, git may complain about conflicts between your local Misago instance, and Misago code modified by other people.

    More better approach to this is overriding Misago templates with custom ones. You can create a plugin to use for development. You can skip "Plugin initialization" chapter and app.py file creation. This plugin only needs to contain an __init__.py file and templates directory where you will put your customized templates. This will make your development instance use your customized templates when they exist and fall back to standard templates from Misago for files you won't override.

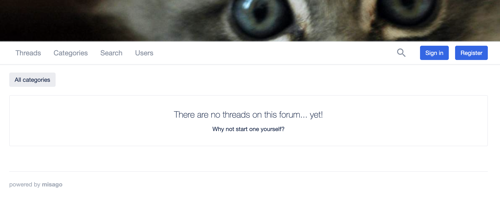
    Simplest way to start customizing template is to copy it from Misago's template directory and put it in your plugin's templates/misago directory. I've created custom jumbotron.html file that displays kitten above the navbar, and modified navbar.html file to remove forum brand from it, but add search link:

    Zrzut ekranu 2023-03-29 o 22.40.44.png

    I've attached my plugin to this post so you can use it as starting point for your experiments.

    insert_drive_file
    misago-templates-plugin.zip

    ZIP, 2.1 KB, uploaded by rafalp on March 29, 2023.

    Zrzut ekranu 2023-03-29 o 22.40.44.png

    PNG, 593.8 KB, uploaded by rafalp on March 29, 2023.

  • March 29, 2023, 10:50 p.m.

    Customizing React.js templates

    Perhaps you've already experienced your HTML customizations flash in your browser only to disappear half a second later? This is a sign that the template you've customized was only a placeholder for client side template.

    Before you can start, you need to make sure you have Node.js installed on your system. If you write node -v in your terminal and you get an error, you will have to download and install Node.js from its site. If you don't know which version to pick, go for "LTS" version. You may also find that you have Node version but its behind current LTS. If thats the case, I recommend update.

    Misago JavaScript and CSS is located in frontend directory. To start customizing those, first copy this directory. Name of copied directory doesn't matter, but for rest of this guide I'll use frontend-copy for it.

    Next, if there's node_modules directory inside of it, delete this directory. Once you've deleted it (or if there wasn't one in the first place), you will need to install Misago's UI development dependencies. To do this open this directory in your terminal or console and run npm install. This process can take a while.

    After this procent has completed, you can start fiddling with Misago UI raw assets located in src and static directories. Start live rebuild running npm rum start. After rebuild process starts (which also can take a while), every time you will edit an asset in src directory, this process will update Misago's css and js files in misago/static/misago directory with new versions containing your changes.

    After you are happy with results, you need to build your CSS and JS files for production use. This is because rebuild process builds files fast, it skips some important optimizations like minifying files by stripping unnecessary information from them. Stop reloader (by pressing ctrl + c in terminal) and then run npm run build. After a while this command will complete and if there are no errors, misago/static/misago directory will contain production ready CSS and JS files (as well as other files you've included in static and src directories.

    You should copy those files somewhere for later upload on your misago-docker site together with HTML files.

  • March 29, 2023, 11:10 p.m.

    Deploying your customizations to misago-docker site

    Your misago-docker site has special theme directory which already has static and templates directories.

    If you upload your plugin's misago directory containing customized templates to theme/templates and run ./appctl restart, your Misago site will begin using those templates instead of standard ones.

    Making Misago use custom JS files is little more complicated. First, you upload them to theme/static/misago/js directory which you need to create if it doesn't exist. Next you tell Misago to collect them for use by running ./appctl collectstatic command. Only after those custom files have been collected you can run ./appctl restart to make your Misago site use them.

    You can also upload other static files (CSS, images, fonts) to theme/static directory and collect them for Misago to use, but themes feature may be simpler option if your customizations don't include JS files.